SpriteStudio Spine 比較検証!
*English translation below
あまたでのデザイン業務は2Dから3Dまで幅広く行っています。
今回は最近あちこちで使われる様になってきた2Dのアニメーションツールのお話です。
あまたはSpriteStudioとSpineの二種類をメインで利用しており、デザイナーは両方を使いこなせるように日々訓練を積んでいます。
そ・こ・で!
前半は両方を使いこなしている弊社のデザイナー3名にツールとしての比較をしてもらい、意見を聞きました。そして後半はUnityに詳しいK氏と共にUnityへインポートし、その後の動作検証を行っていきました。SpriteStudioのUnityインポートは最新の【SpriteStudio6 Player for Unity】を利用していきます。
素材はどちらも同じ物を用意し、それを双方に組み込んで実際にアニメーションを作ってもらっています。
—————————————————–
◆ツールとしての比較
【SpriteStudio】
ここが〇
・キーフレームがまとまっており、キーの一括選択がしやすいのでコピーミスやキー漏れがおきにくい
・アニメーションの補間性能が凄くいい。なめらかな補間になる
・UIの情報が多いが、その分親切な内容である
・日本語のチュートリアルサイトが豊富
・メッシュ機能を使わないものならアニメーション編集は簡単(ボーンいらず)
・ボーンとメッシュ機能搭載(SpriteStudio Ver.6から)
・パーティクル機能があり、エフェクトに使える
・アトラスはデザイナー側で作ったものがそのまま出る
ここが×
・キーフレームの一括表示、非表示がない
・1つのデータしか開けない(2つのデータを並べて比較できない)
・IKがないので地面への足固定などの動作は作りにくい
【Spine】
ここが〇
・ソフトの動作が軽い
・同時にいくつものデータを開ける(並べて比較可能)
・UIがシンプル
・ボーンがあるのでIK制御可能
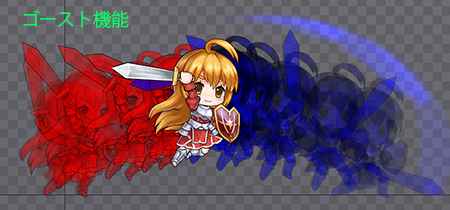
・ゴースト機能があるので、前後のポーズを確認しやすい
ここが×
・ボーンをつけるのが手間
・パーツにサムネイルがないので、パーツによってはすぐに見つけられなかったり、パーツ名からどのパーツか確認するのが手間
・Hierarchyがジョイントと画像の二段構えなので長くて見にくい
・アニメーションの補間性能が良くなく、手動で調整するとキーが増えてしまう
・アトラスは自動生成される
デザイナー3名にSpriteStudioとSpineを比較して双方のいいポイントをあげるとしたらどこ?という質問に対して全員一致で以下の回答。
SpriteStudioは
『アニメーションの補間性能の良さ』
でした。これによりかなり作業工数が減るとの回答。
Spineは
『ソフトの動作が軽い』『複数データを開ける』
でした。
他に三人が口を揃えて言っていたのはSpriteStudioでは、セルマップ・レイアウト・フレームコントロールの三つのウインドウが連動して表示されているので、パーツ名や並んでる画像、もしくはレイアウト上の画像をクリックすれば、それぞれがどれなのか同時に選択されるので自分が選んでいるものがパッと把握できる点もGood。
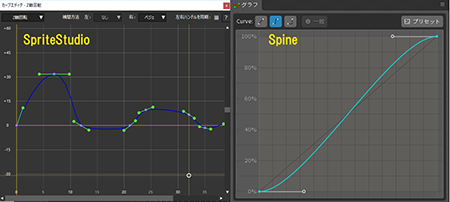
又、上記の項目にはありませんが、カーブエディタ部分でも以下の画像を見て分かるようにSpriteStudioは複数カーブ範囲が表示されるので全体を見渡しながらカーブを編集できるのに対し、Spineはキーとキーの間。インとアウトのハンドルを制御するのみとなっています。カーブ制御も全員一致でSpriteStudioにGoodを出しました。
以下は【SpriteStudio】と【Spine】の動画比較。
上がSpriteStudio、下がSpineです。
![]()
—————————————————–
◆Unityに読み込んだ場合の比較
【SpriteStudio】【SpriteStudio6 Player for Unity】
・79~83fps
・Batches:4
・SetPass calls:4
・階層はそのまま見られるのでパッと見て分かりやすい
・テクスチャー差し替えが可能
・描画モード(加算や乗算)を使えば使うほど、その分だけ表示に使用するマテリアルが増える
・UnityのSpriteへの変換機能有り
【Spine】
・76~82fps
・Batches:3
・SetPass calls:3
・データそのものが一つの塊になっており、一手間かければ中身の階層を見る事ができる
・テクスチャー差し替えを行ったら、元データから壊れてしまった
Unityへのインポートに関しては双方簡単に行えます。fpsはほぼ同じですが、わずかにSpriteStudioの方が良好な結果に。その他、Unityを使う上で気にすることが多い、BatchesとSetPass callsの差については、気になる点。
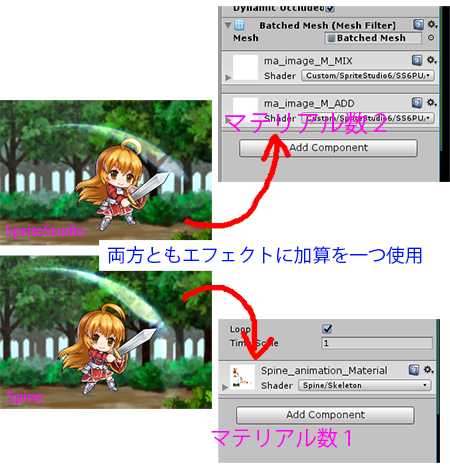
この差について、SpriteStudioのデータをK氏が確認したところ描画モード(加算や乗算等)を増やすとSpriteStudioの場合は追加する分だけマテリアルが増えるという状態を確認。これがBatches数、SetPass calls数のカウントになるようで、上記のサンプル結果は剣の軌跡エフェクトに加算を入れていた為の差でした。
ただし、Unity上でマテリアルの編集を行う場合は、個々の要素で別れているこちらの作りの方が自由度が高く良いかと思います。なによりも、Unity上でアトラスを入れ替えるケースは多いので、その自由度の高さで選ぶのも良いかも知れません。
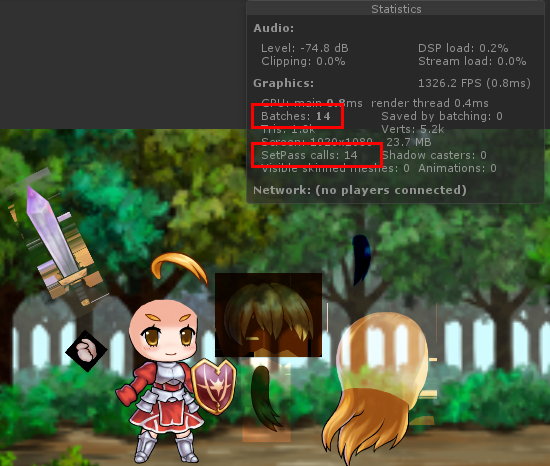
ちなみに無理やり描画モードを追加した状態が以下の画像です。Batches、SetPass callsが大幅に増えているのが見て取れます。実パフォーマンス優先で、UnityのSpriteへの変換機能(Unity-Nativeモード)の利用を考えても良いかも知れません。(Unity側のバッチングに任せることでBatches数は増えますが、その分高速に表示できるそうです)
—————————————————–
同一Scene上にどの程度他のオブジェクトを表示するかにもよりますが、SpriteStudioのデータをUnityで使う場合には、加算と減算の使用箇所に注意する必要がありそうです。
今回はデザイナー目線での検証でしたが、いかがだったでしょうか?
ボーンとメッシュが使えるようになった事で、Spineの主要機能をカバーする様になったSpriteStudio。パーティクルが使えるようになったので、キャラクター制作途中に簡易なエフェクトを作って合成するところまでカバー出来るようになりました。(加算・減算の適用箇所に注意は必要そうですが)
特に、今回検証に参加したデザイナー陣は3Dツールの経験が豊富だったこともあり、SpriteStudioのカーブエディタの評価が高かったです。
多機能なSpriteStudio、ツールが軽いSpine。どちらのツールも良い所、悪い所は当然ありますし“慣れ”の部分も大きいかもしれません。ですが純粋に双方を使った感想、感触というものが参考になれば幸いです!
(超ごろー)
Putting two animation software suites to the test – A comparison of SpriteStudio and Spine!
Here at AMATA we carry out a wide range of design work ranging from 2D to 3D.
Today’s column is about 2D animation tools that have recently begun to see widespread use.
At AMATA, we use SpriteStudio and Spine as our two main tools, with artists working hard each day to master them both.
And so!
In this first half, we asked three of our artists who are familiar with both to compare each as a tool and give their opinions. In the second half, we then imported everything over to Unity with K, who is familiar with Unity. Next, we carried out operational validation. We used the latest [SpriteStudio6 Player for Unity] for SpriteStudio’s Unity import.
We used the same materials in both tools, and our artists incorporated these materials to make actual animations.
—————————————————–
◆ Comparison as a tool
[SpriteStudio]
Good points
・Key-Frames are well arranged, and collective key selection is easy, resulting in fewer copy mistakes and key omissions
・Animation interpolation performance is very good, and interpolation is smooth
・There is a lot of UI information, but it is all helpful
・There are abundant tutorial websites in Japanese
・If you do not use the Mesh feature, editing animation is easy (no need for the Bone feature)
・Includes a Bone and Mesh feature (from SpriteStudio Ver. 6)
・Includes a Particle function which can be used for effects
・Atlases display as made by the artist
Bad points
・No way to collectively show/hide Key Frames
・Only one file can be opened at a time (no way to compare two files side by side)
・As there is no inverse kinematics (IK) function, it’s difficult to create animations such as feet fixed to the ground, etc.
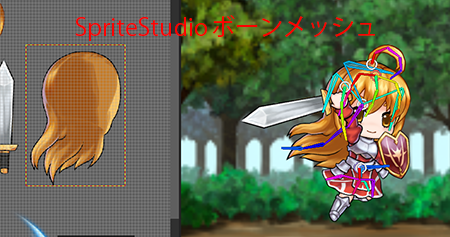
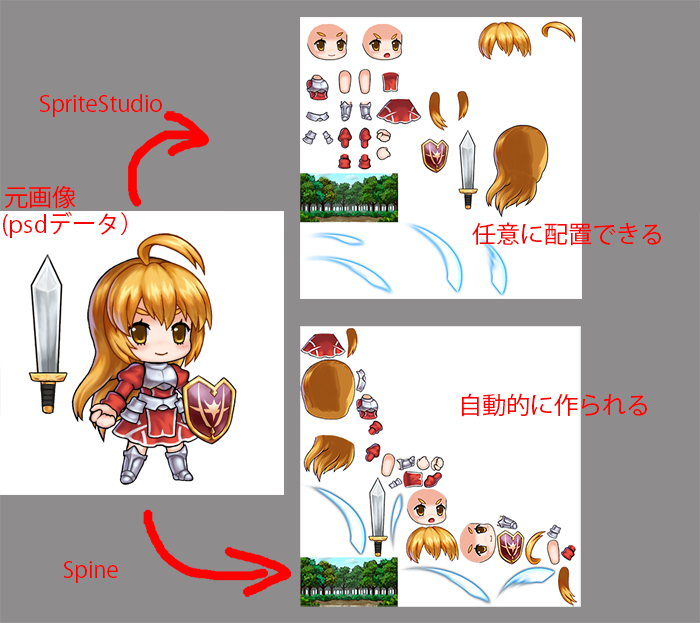
SpriteStudio’s Mesh and Bone Feature
SpriteStudio
Original image(psd data)
Place as desired
Spine
Automatically created
[Spine]
Good points
・Software operation is not resource-intensive
・Multiple files can be opened at once (side by side files comparison possible)
・Simple UI
・Bone functionality means IK control is possible
・Ghosting feature makes it easy to check positioning poses before and after the current frame
Bad points
・Using the bone feature is fiddly
・Since parts do not have thumbnails, some parts can be difficult to find. Also, it can be hard to distinguish parts by name
・Hierarchy is arranged in two tiers of joints and images, so it’s longer, and difficult to get a good view of things
・Animation interpolation performance is poor, and keys will increase if you adjust it manually
・Atlases are automatically generated
Ghosting feature
When we asked our three artists, everyone agreed on the following as good points for both tools.
SpriteStudio was praised for its
“animation interpolation performance quality,”
with this quality reducing man hours considerably.
Spine was praised for
“not being resource-intensive,” and having the ability to “simultaneously open multiple files.”
One other thing all three agreed on was that it’s easy to see what you’re doing in SpriteStudio. This is because the cell map, layout, and frame control windows are displayed in conjunction with one another. If you click on an image, part name, or image in a layout, your selection is immediately obvious since the various locations are selected simultaneously.
Also, although not listed above, SpriteStudio allows an overall view of multiple curves while editing. This is shown in the curve editor image below. In contrast, Spine only provides a view between keys, and only offers control of an in and out handle. All three artists came to a unanimous decision that SpriteStudio curve control was a good point.
Below is a video comparison of [SpriteStudio] and [Spine].
The top video is SpriteStudio, and the bottom is Spine.
![]()
—————————————————–
◆ Comparison when exporting to Unity
[SpriteStudio] [SpriteStudio 6 Player for Unity]
・79 to 83 fps
・Batches: 4
・SetPass calls: 4
・Hierarchy can be seen as it is, so it is easy to understand at a glance
・Texture replacement possible
・The more you use draw modes (addition or multiplication), the more the materials to display increase
・There is a function to convert to Unity sprites
[Spine]
・76 to 82 fps
・Batches: 3
・SetPass calls: 3
・The data itself is stored as a chunk, and viewing the layers of the content is possible with a little effort
・When replacing a texture, the original data was corrupted
Both can be easily imported into Unity. While the fps is basically the same for both, SpriteStudio produced slightly better results. Otherwise, batches and SetPass calls are significant when using Unity, and the difference was something that caused concern.
Regarding this difference, K checked the SpriteStudio data for reasons. We found that increasing draw modes (addition, multiplication, etc.) also directly increased the number of materials in SpriteStudio. This seems to correspond to the number of batches and the number of SetPass calls, and the above sample results differed due to the addition of a swing effect to the sword.
However, when editing materials in Unity, individual elements are separated. This method of creation seems to offer more freedom. Most importantly, replacing atlases in Unity is quite common, so selecting for the higher degree of freedom may be wise.
Number of Materials: 2
One effect addition used in each
Number of Materials: 1
Incidentally, a case where the draw mode was forcibly added is pictured below. You can see that the batches and SetPass calls are substantially increased. It may be good to consider using the conversion to Unity sprite function (Unity-Native mode) in terms of prioritizing actual performance. (The number of Batches will increase when leaving batching to Unity, but it seems they can be displayed proportionally faster)
—————————————————–
While it depends on how many other objects are displayed within the same scene, if you use SpriteStudio data with Unity, you may need to pay attention to places where additions and subtractions are used.
These reviews came from an artist‘s point of view, but what did you think?
With the added ability to use the Mesh and Bone Feature, SpriteStudio can now cover for Spine’s main functionality. Now that you can use particles, SpriteStudio can even handle things like the generation and synthesis of simple effects during character creation at this point. (Although attention needs to be given to places where addition/subtraction is used)
In particular, the artists who participated in this comparison were experienced in 3D tools, and SpriteStudio’s curve editor received high marks.
SpriteStudio boasts multifunctionality, and Spine offers resource-friendly tools. It’s natural that both tools have good parts and bad parts, and familiarity may be a major factor with them. We hope these impressions and thoughts on this software will come in handy!
(Cho-goro)